# Welcome
## Welcome
Welcome to the 4DSKY Flight Tracking Network! Here you’ll find everything you need to join and contribute to the world’s first and only edge-native flight‐tracking network, built on top of Neuron's machine-to-machine infrastructure.
What is an edge network? An edge network enables software applications such as drone apps and airport flight information displays to connect directly to sensors enabling safety critical use-cases, via low latency, high availability, assured software with clear data provenance through the stack.
Other flight tracking networks are built on centralised servers, that are not suitable for safety critical applications, due to single-points-of-failure, high network latencies, and difficulty in achieving software assurance. Our founders have over 30 years of combined combined experience in aviation safety verification, which has led to the development of this network alongside the support of the UK Civil Aviation Authority.
4DSKY is transforming aviation, not just building business as usual technology. If you are looking for a DePIN project that was dreamt up in a PhD lab, with real world airport and drone customers, and cutting edge technology, this one is for you!
Below you can navigate to:
* **Information** about our mission, technology, and sensor hardware
* **Buy a Sensor** bundles from Jetvision
* **Setup Instructions** to get your sensor online
* FAQs to answer common questions
Let’s get you started!
# Our Story
The UK has a history of pioneering inventions in aviation—from the jet engine to the first supersonic airliner. Five years ago, Neuron’s UK‑based founders assembled a team of experts to tackle one of the industry’s biggest challenges: integrating drones safely into shared airspace.
Our goal was ambitious: build a flight‑tracking network that met technical, economic, and regulatory requirements while remaining open, accessible, and community‑owned. We iterated through prototypes, collaborated with regulators, airports, drone operators, and general aviation pilots, and demonstrated live drone flights at Cranfield University’s DARTeC research facility.
Now, as we approach the aviation singularity, we’re ready to hand ownership to the community of aviation and DePIN enthusiasts who are making this dream a reality. Share your data, get rewarded, and become part of aviation history!
# How 4DSKY Works
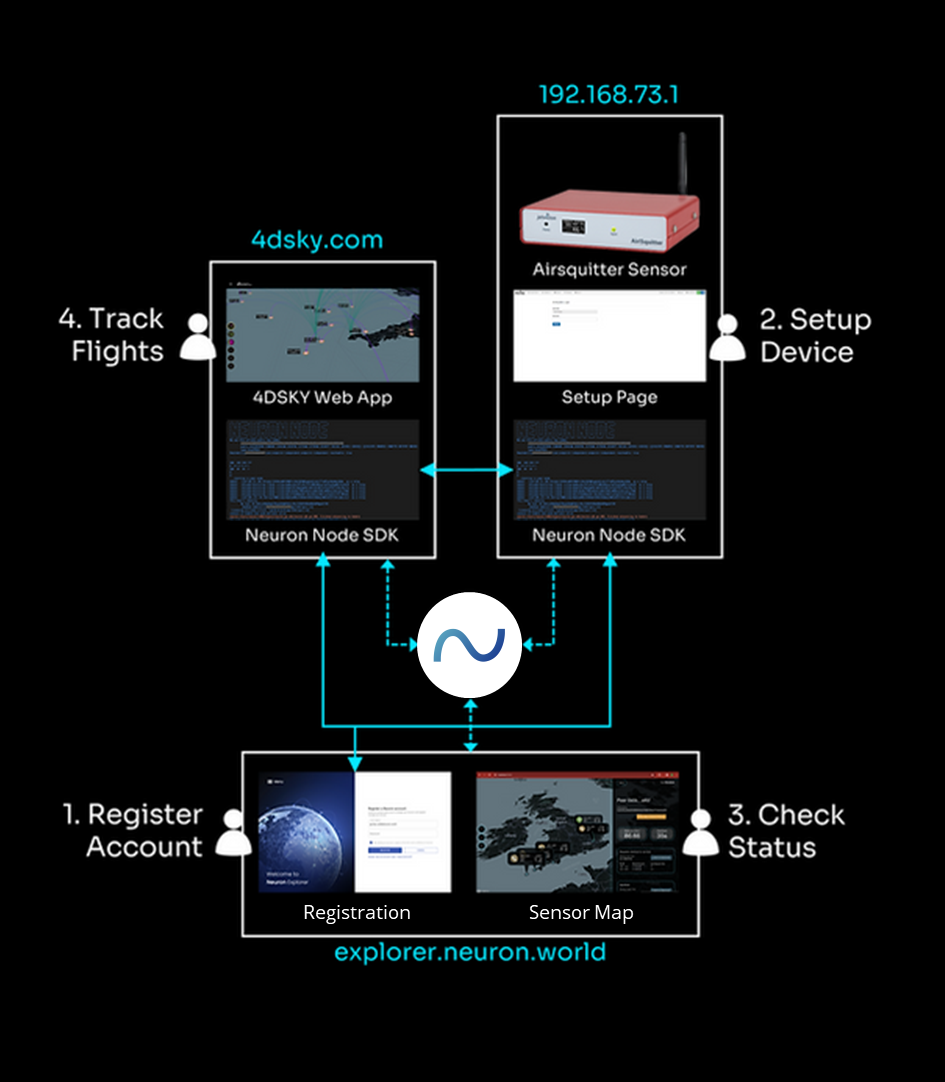
Neuron nodes turn the Airsquitter sensor into a network node that can be connected to directly by 3rd party software. Both nodes and the explorer are connected to the Hedera testnet that provides a range of decentralised services that ensure the network remains open, and community governed.
Any software applications (customers) can connect to your sensor directly or obtain data feeds via the 4DSKY Edge software.
The 4DSKY network comprises of 3 key user interfaces:
* Customers: such as the [4DSKY](http://www.4dsky.com/) Flight Tracking Software
* Service Providers: such as the Jetvision Airsquitter Sensors
* Explorer: Registration System & Discovery Service
# What You Need to Participate
To contribute your sensor node, you will need:
* **Purchase a sensor** (From $985 USD)
* **High installation point** (roof, mast, attic)
* **Mains power** outlet nearby
* **High‑speed internet** (Ethernet or stable Wi‑Fi)
* **1 hour of your time** for setup
Once online, your sensor will begin feeding data to the 4DSKY network, and earning you points.
# Sensor & Installation
We’ve partnered with Jetvision to offer a professional‑grade Airsquitter sensor bundle:
* **Airsquitter receiver** with Neuron SDK
* **1 or 2× antennas** (1090 MHz + 868 MHz or 978 MHz)
* **Ethernet**, **power**, and **antenna cables**
> **Note:** Mount the receiver indoors (0 – +60 °C), close to power & your router.\
> Antennas need a clear 360° sky view, ideally on a roof or mast (cable runs ≤ 30 m).
Optional: use a Wi‑Fi extender if you cannot hard‑wire Ethernet.
# Benefits & Rewards
## Rewards
The 4DSKY network rewards you with points for contributing high‑quality data to the network. The amount of points you currently earn will be a factor of the following:
* The reliability of your device
* The length of time your device has been installed
To maximise rewards, try to focus on the following parameters:
* **Coverage**: place your sensor in a high location with an unobstructed view of the sky in all directions to gain maximum coverage of the airspace
* **Location**: be the first person in a unique location, and greater than 2km from other antennas. Nearby airports are a bonus!
* **Reliability**: make sure you have a high quality installation, with reliable internet connection and antenna setup
If you follow the above rules, you will maximise your points earnings for your location. We may refine the algorithm over time to optimize the network. You will be given at least 2 weeks notice before this happens. Any points already earnt will be retained by you.
When we move to mainnet, you will receive an airdrop of tokens proportional to the number of points you have accumulated during the beta, so start earning points now if you want to maximise your rewards!
To find out more about how points work and how we provide awareness of sensor network distrubtion, see the following pages:
{% content-ref url="/pages/wckCZibwSDmgru7KJKLU" %}
[How are points calculated?](/faq/how-are-points-calculated)
{% endcontent-ref %}
{% content-ref url="/pages/5ZLRfcwfBE13NdXjlsEz" %}
[What is the hex based coverage model?](/faq/what-is-the-hex-based-coverage-model)
{% endcontent-ref %}
## Other Benefits
By installing and running a 4DSKY sensor you will also:
* **Improve local coverage**\
Increase surveillance in your area, enhancing safety for aviators and enabling new drone services.
* **Track flights in your area**\
Enjoy real‑time 3D maps of aircraft - addictive once you start!
* **Learn cool things**
Learn about flight tracking, aviation, and DePIN technology
Flight tracking is great fun, and our community is very excited about contributing data to the network.
# Jetvision Airsquitter
4DSKY has teamed up with Jetvision, a German avionics manufacturer with 15 years of experience in the sector, to bring you the best performing, aviation grade, flight tracking sensors on the market. Trusted by companies like FlightRadar24 and FlightAware, the Airsquitter is already being used by defence companies, aerospace giants, and airports worldwide.
Unlike other flight tracking sensors which are only able to receive ADS-B signals from aircraft (60% of current aircraft), the Jetvision Airsquitter is able to detect up to 4 different types of transponder. It features ADS-B, UAT and Flarm receivers as standard and has one of the highest performing MLAT capabilities in the market, enabling detection of mode-S transponders too.
This wide range of detection capability means you can track more aircraft, ensuring the highest standard of security and safety, and allowing you to serve more applications to earn more rewards!
You can purchase a device via our partners at Helium Deploy:
Buy a Sensor
## Types of Sensor
There are 4 different configurations of the Jetvision Airsquitter sensor depending on where you live. Each jurisdiction uses different types of transponder on aircraft and has different RF frequency bands. Each Airsquitter comes with MLAT capable ADS-B as standard enabling detect of (ADS-B, mode-S and mode-C aircraft), and then has an optional choice of either UAT, Active Flarm, or Passive Flarm as an additional antenna. \
\
The US for example has a lot of general aviation aircraft that use UAT, so these can only be detected with a UAT receiver. European countries tend not to use UAT, but have a high prevalence of Flarm equipped aircraft.
The four options are as follows:
* ADSB only (worldwide)
* UAT bundle (US + other customers)
* Passive Flarm bundle (Australia, South America + other customers)
* Active Flarm bundle (Mostly Europe)
The Jetvision Airsquitter sensor is identical for each of these bundles. The only difference is the antennas and software setup, which can be changed with a few clicks. If you are not sure which to buy, please refer to the manufacturers recommendations for your country, or you can contact them via email at for further advice and information.
## What's Included?
Each bundle comes with the following components:
* Jetvision Airsquitter receiver
* 1090 MHz ADS‑B + GNSS antenna
* OPTIONAL additional antenna (UAT, active Flarm, or passive Flarm)
* 10m antenna cables
* Ethernet cable
* Power adapter
* Mounting brackets
> Note: mounting pole and tools for installation are not included
Buy a Sensor
# Other Supported Sensors
Whilst we recommend the Jetvision Airsquitter, 4DSKY can also support:
* **uAvionix PingStation 3** ($3 000 USD)
* ADS‑B, MLAT & UAT in IP67 enclosure
* Requires extra hardware
* Requires configuration
If you have another MLAT‑capable ADS-B receiver, reach out on Discord to discuss integration. We are keen to support additional sensors.
Alternatively, you can connect any open device (i.e. one that lets you access the data) using the Neuron Node Builder software ([www.neuron.world/builder](https://www.neuron.world/builder)). This allows you to connect any sensor, and build a community of contributors to your network.
# Unboxing & Package Contents
When your Jetvision bundle arrives, please check you have the following components:
* Jetvision Airsquitter sensor
* 1× 1090 MHz ADS‑B+GNSS antenna
* OPTIONAL 1× 868 MHz or 978 MHz antenna (region‑specific)
* 1 or 2 × antenna cables
* 1 or 2 × antenna mounting brackets
* Power cable with international adapters
* Wi‑Fi antenna
* Ethernet cable
* Leaflet
Missing something? Contact Helium Deploy support
# Antenna & Sensor Placement
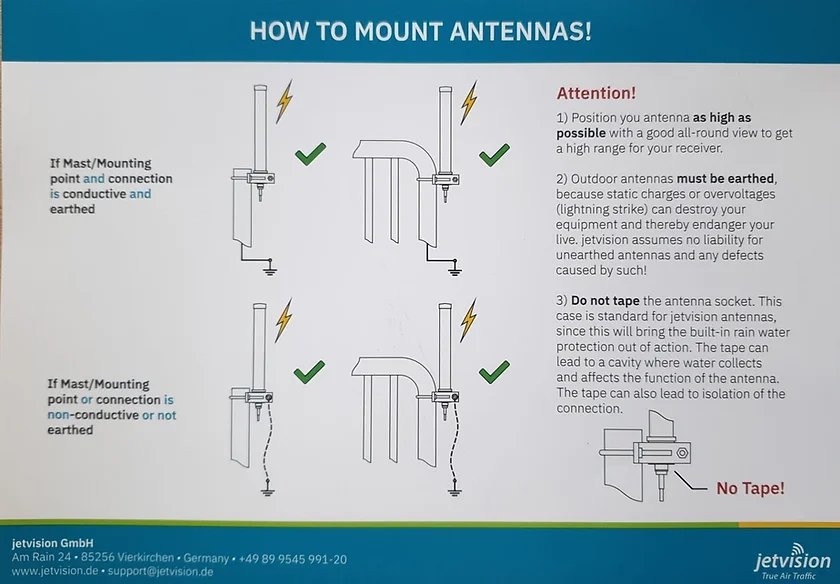
To decide where to put your sensor and antennas, please refer to the following:
> Tip: on a rooftop mast, or inside an attic roof works best providing it’s not obstructed by metal
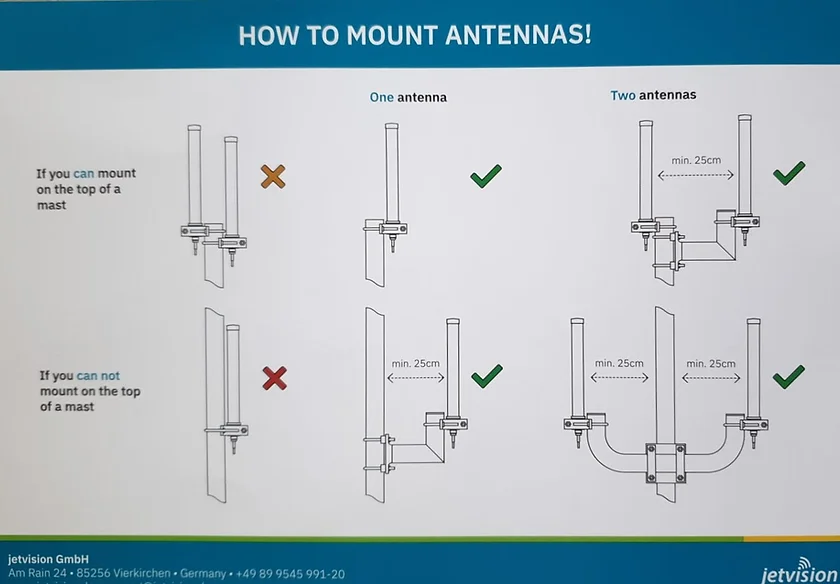
When installing your 2 antennae please refer to the following instructions from the manufacturer:
# Connecting To The Internet
## Sensor Setup
Follow the manufacturer’s manual to configure your Airsquitter:
Setup Instructions
> Important: only use the ethernet method to setup your Jetvision. Do not use the micro-USB as this does not work.\
> \
> Tip: If you plan to use wi-fi to connect your device, use ethernet to configure your wi-fi network first, then move your device closer to your antennas, and complete setup.
Key steps:
1. Plug the Airsquitter sensor into your router via ethernet cable
2. Power the sensor with the supplied power cable
3. Click the black button on the front of the sensor until you see an IP address on the small LED screen (it should look something like 192.168.1.xxx)
4. Type this into a browser window on another device (e.g. phone or laptop) that is connected to the same router
5. You should arrive at the home screen of your Airsquitter
6. Go into network settings to configure your wi-fi with the network name, and password
7. You should be connected to the internet
# Connecting to Neuron
To get your JetVision Airsquitter setup and communicating with the Neuron network, simply register for an account on [https://app.4dsky.com](https://app.4dsky.com/) and follow the instructions under 'Setup My Sensor'
## Summary
To connect your sensor to the Neuron network, go to [https://app.4dsky.com](https://app.4dsky.com/) and follow the 'Setup My Sensor' wizard to obtain your device credentials.
Once you have your device account number and private key, you will need to insert that into your sensor. To do this, you must connect to your sensor by visiting the following IP address and following the wizard:
> http\://\:1337 (replace \ with your sensor's local IP address)
You can find out your sensors local IP address by pressing the button on front of your sensor a few times until you reach the "LAN" or "Wi-Fi" screen (depending on your connection type). \ is the IP address at the top of the respective screen. It should have a format of 192.168.1.XXX
Once complete, your sensor will now be contributing to 4DSKY. You may need to wait 5 minutes for it to refresh.
# Troubleshooting & Support
* **FAQs**: first visit the FAQs section to see if there is an easy fix
* **Discord**: please join our community to ask other 4DSKY users for help
* **Support Ticket**: open a support ticket via our help centre: [https://support.4dsky.com](https://support.4dsky.com/)
Join Discord
# Advanced Security
Its really important that users are security conscious, and never store private keys that hold any digital assets (tokens, NFTs etc) on any of your devices.
There are a number of things you can do to reduce the risk of any unauthorised access to your Airsquitter. We recommend users to follow these instructions to bolster their security.
{% file src="/files/lzqgU85RETPLfh09zewE" %}
> **IMPORTANT**: 4DSKY and Neuron will never send you a link asking for money or for your private key. If you ever connect your wallet to 4DSKY or Neuron, make sure you are on the 4dsky.com or neuron.world URL. Any request to connect your wallet from other URLs is likely to be a scam and you may lose some or all of your money. Be careful!
# How are points calculated?
4DSKY rewards users who contribute sensor data to the network. Points represent your sensor’s contribution during the beta phase and help track participation as the network grows.
Points are awarded to sensors that are **online and actively contributing data**.
## Current Points System
At the moment, the points system is intentionally simple.
Each active sensor earns:
**25 points per day**
Points are awarded **once per day** to sensors that are online and transmitting data to the network.
This approach keeps the system easy to understand during the early stages of the network while comprehensive point formulas and quality metrics are finalised.
## What Counts as Activity
To receive points, a sensor must be:
* Online
* Successfully transmitting data to the network
If a device is offline, points will not accumulate during that period. Once the device comes back online, points will resume as normal.
## Points Sources
Points may come from several sources:
#### Daily Contribution
Sensors that remain online and contribute data receive **25 points per day**.
#### Purchase Bonuses
Some users may receive bonus points when purchasing a sensor as part of promotional campaigns.
#### Historical Contributions
Early users who contributed to the network before the introduction of the points system may receive bonus allocations recognising those contributions.
## When Points Are Awarded
Points are calculated and distributed **once per day**.
Your points balance will update after the daily calculation process completes.
Additional point awards (for example purchase bonuses) are allocated as part of the daily points awarding process and are only awarded when a device is online.
## Future Improvements to Points
The current points model is intentionally simple while the network is still growing.
In the future, the points system may incorporate additional contribution metrics such as:
* Sensor reliability
* Coverage quality
* Geographic contribution
* Data usefulness
These metrics are **not currently used in scoring**.
Before any changes are introduced:
* The metrics will be clearly published
* The community will have visibility into how they work
* A consultation period will occur before quality metrics impact point awards
This ensures everyone understands how their contributions will be evaluated.
## How Coverage is Organised
To understand where sensors are deployed and how coverage is distributed across the network, 4DSKY uses a geographic grid system based on **hexagonal regions**.
This system helps the network organise coverage, identify gaps, and plan future incentives.
You can learn more about this system here:
{% content-ref url="/pages/5ZLRfcwfBE13NdXjlsEz" %}
[What is the hex based coverage model?](/faq/what-is-the-hex-based-coverage-model)
{% endcontent-ref %}
# What is the hex based coverage model?
4DSKY uses the **H3 geospatial indexing system**, an open-source framework developed by Uber.
H3 divides the world into a grid of hexagons at different resolutions. Each hexagon represents a defined geographic area.
4DSKY currently uses **H3 hexes at resolution level 7**.
This provides a balance between:
* Geographic detail
* Coverage planning
* Location privacy for sensor operators
Hexes currently organise sensor coverage and protect location privacy.\
They **do not currently affect the number of points a sensor earns.**
## Why the Network Uses Hexes
The hex system serves several purposes within the network:
### Location Privacy
In future updates, exact device coordinates are not exposed publicly to non-paying buyers.
Instead, sensors are associated with the hex region they operate within. This helps protect the precise location of sensor deployments.
### Coverage Planning
Hexes allow the network to visualise where sensors are deployed and where additional coverage is needed.
This helps identify:
* Underserved regions
* Areas where additional sensors would improve the network
* Locations that may become important for future aviation infrastructure
### Preventing Sensor Stacking
Without geographic balancing, users could install many sensors in the same location to maximise rewards.
The hex model helps prevent this by encouraging **distributed deployments** rather than clustering.
For example:
* Deploying **multiple sensors in the same hex** does not significantly improve coverage.
* Deploying sensors across **multiple hexes** improves the network’s geographic reach.
This ensures rewards are aligned with meaningful coverage contributions.
## Hex-Based Incentives (Future)
In the future, hex regions may play a role in how contributions are evaluated.
Examples of potential incentives include:
* Bonuses for sensors deployed near **airports**
* Rewards for covering **drone corridors**
* Incentives for filling **coverage gaps**
These mechanisms would allow the network to encourage deployments in locations where additional coverage is most valuable.
These features are **not currently active** and will only be introduced after community consultation.
## Hex Priority and Sensor Density
As the network grows, hexes will also help determine how rewards are shared when multiple sensors operate within the same region.
This can help prevent reward exploitation and ensure that points reflect **real network contribution rather than simply the number of devices deployed**.
Any future changes involving hex-based reward models will be announced in advance of impact on point awards.
# When will you launch your token?
## Token Launch Timing
Whilst we would love to give you a definitive answer to this question, we feel its important to try to maximise value, ensuring that the token launch is as successful as possible. In order to do this, a number of things need to align, and some of these things are partially outside of our control.
Currently we are planning to launch our token when we transition from testnet to **mainnet**, targeted for **2026**.
> **Note:** timing may shift based on technical factors and market conditions\
> Eligible participants will receive an airdrop of tokens proportional to points accumulated
# How long will it take to deliver my sensor?
## Sensor Delivery Time
Delivery depends on the manufacturer’s stock and shipping. Typically:
* **Transit**: ≤ 2 weeks
* **Delays**: contact the vendor’s support if you haven’t received within 14 days
For Jetvision support:
```
support@jetvision.de
```
# Where can I get support?
We recommend joining our active community on Discord where fellow 4DSKY users are often able to provide help for new users.
Join Discord
If you are unable to find the answers you need on Discord, visit our support centre to get help with your JetVision device or the 4DSKY website. If you are unable to get the answer you need from our existing help centre, you will be able to reach out to a member of our support team
You can find our support centre here:\
# Can I integrate my own sensor?
## Integrating Your Own Sensor
Currently, only the Jetvision Airsquitter is plug‑and‑play with the 4DSKY network. If you have another MLAT‑capable sensor:
1. **Contact us** on Discord or via email
2. **We’ll evaluate** integration requirements
3. **Potentially provide SDK guidance** to connect your hardware
If you have a sensor that is suitable for the network, and meets technical and regulatory requirements, we will do our best to accommodate you.
# Most common issues
# Do this first: How do I know if the device is neuron enabled?
Check your order. Have you ordered a neuron enabled device?
If that's the case, look at the top right corner `http://my-jv-ip-address` [What is my JV device IP address and how do I know if it's a valid one](/most-common-issues/what-is-my-jv-device-ip-address-and-how-do-i-know-if-its-a-valid-one) using a desktop browser. Then,
* if you DO see `NEXX` [What is my neXX number?](/most-common-issues/what-is-my-nexx-number)
* and you DO NOT see `non commercial` [How to tell if the commercial licence is enabled?](/most-common-issues/how-to-tell-if-the-commercial-licence-is-enabled)
then you know you bought the right device. If any of these two above are not satisfied then contact jetvision immediately. This is how it should look like:
Second step is to test if the neuron software is enabled
goto `http://my-jv-ip-address:1337` If the setup screen is not showing, i.e you see an error message, then neuron is **not installed**. Note that if you have steup the device before using the :1337 page then it will not load. It's a first run wizard that dissapers after setting up things.
You can manually install it yourself by [installing the neuron updater](/most-common-issues/how-do-i-install-the-neuron-updater), which will downlod the program to your device, or enable remote support and ask us in discord to do it for you.
{% content-ref url="/pages/fdc0zLWII1Ho959ApCZG" %}
[What is my JV device IP address and how do I know if it's a valid one](/most-common-issues/what-is-my-jv-device-ip-address-and-how-do-i-know-if-its-a-valid-one)
{% endcontent-ref %}
{% content-ref url="/pages/1n1JlGkn5hW5HKztaPcC" %}
[What is my neXX number?](/most-common-issues/what-is-my-nexx-number)
{% endcontent-ref %}
{% content-ref url="/pages/emlyevHI5FDSWvYgiyTx" %}
[How to tell if the commercial licence is enabled?](/most-common-issues/how-to-tell-if-the-commercial-licence-is-enabled)
{% endcontent-ref %}
{% content-ref url="/pages/GDK1lbFdKBsRzSiPOCtC" %}
[How do I install the neuron updater?](/most-common-issues/how-do-i-install-the-neuron-updater)
{% endcontent-ref %}
{% content-ref url="/pages/Y0P6f7p6ZqHutiWAgHOL" %}
[How do I enable remote support?](/most-common-issues/how-do-i-enable-remote-support)
{% endcontent-ref %}
# What is my JV device IP address and how do I know if it's a valid one
Assumption is that the red box is connected via an ethernet cable (or wifi after it was first setup with ethernet cable). Check the screen on the red box and flick through it until you get the LAN settings.
Check the first line
> * ✅ A good address is 192.168.x.x, or 10.x.x.x
> * 🚫Not a good address: 169.254.x.x . It means that your device has no access to the internet. It has access to your local network but not the internet (it's called a link-local address)
Check [how to tell if I'm connected to the internet](/most-common-issues/how-to-tell-if-the-device-is-connected-to-the-internet), and how to [connect the device to the internet](/setup-instructions/connecting-to-the-internet).
# What is my neXX number?
The neXX is a Jetvision assigned neuron identifier that helps us and JV troubleshoot you. It also is an indicator that your device in neuron enabled (among [other things to check if device is neuron enabled ](/most-common-issues/do-this-first-how-do-i-know-if-the-device-is-neuron-enabled))
You'll find it in the upper right side of of the admin in `http://your-ip-address/`
⚠️ If it's not there then contact JV or our discord. Your device is not neuron enabled.
Alternatively, go to System Status > MLAT Server Status
⚠️ If it is saying anything else but neXX then contact us or JV.
# How to tell if the commercial licence is enabled?
Jetvision devices need to have a commercial license applied because without it, the data buyers will reject the data. Commercial licenses enable high precission time stamps. The way to know if you have one is by checking the status messages on `http://your-ip-adress`
If it says (non commercial) then contact us or JV, your device is not [fully neuron enabled](/most-common-issues/do-this-first-how-do-i-know-if-the-device-is-neuron-enabled).
# How to tell if the device is connected to the internet?
Go to the [device's IP addres](/most-common-issues/what-is-my-jv-device-ip-address-and-how-do-i-know-if-its-a-valid-one) and then navigate to status > mlat network. \
\
If the logs have no complaints then you have internet connectivity
An OK log.
If there are errors, i.e. `not connected` or `name error`, then you need to [setup the device for internet connectivity.](/setup-instructions/connecting-to-the-internet) Also make sure your [device assigned IP address is a good one](/most-common-issues/what-is-my-jv-device-ip-address-and-how-do-i-know-if-its-a-valid-one). If you still gate name errors then you likely have issues with your router's or ISPs DNS system. You can attempt to [fix name errors yourself](/most-common-issues/i-get-dns-resolution-errors)
# I got the device all wired up and internet ready. What now?
You can get your device connected in 3 easy steps:
1. Head over to [https://app.4dsky.com](https://app.4dsky.com/)
2. Register for an account and setup your profile
3. Follow the "Setup My Sensor" wizard
# I made an account on explorer.neuron.wrold, now what do I do?
It is important you follow every step in this video
⚠️ If you ignore the video you will likely think that you have finished the UI wizard, **there's an easy-to-miss step**, and you may end up with an unregistered device. Watch the video and use the pause button to stay in sync.
{% embed url="" %}
# My device shows as registered with the service unregistered and disabled
The expected state of the device needs to be Registred
The expected status state is UNREGISTRED and DISABLED for now, but the device needs to be "REGISTERED"
This is OK!
This is OK ✅\
Not having a service at all is not OK ⛔
# Where can I check how many points I’ve earned?
Login to https\://explorer.neuron.world and navigate to the device you have setup.
* do not try to find points in the main account page.
* points [do fluctuate](/most-common-issues/why-are-my-points-fluctuating), this is OK
# Why are my points fluctuating
Fluctuations are totally normal and nothing to worry about.
\
Your points depend mainly on when your device came online and how many heartbeats it’s sent—both of which are recorded on the ledger. The current formula compares what’s come in so far against what should have come in, and that can cause the score to bounce around a little—especially early in the day or after downtime.
:tada: It’s not a bug, it’s not a penalty, and it doesn’t affect your long-term score.
We’re already working on an updated version of the algorithm that handles this better—so honestly, the current number doesn’t matter too much right now.
:heart: Bottom line: Your device is fine, we’ve got the data, and you’re part of the beta. Thanks for helping shape the future!
# I am asked to navigate to a :1337 page but it doesn't load
If you have used that page before to setup your neuron credentials then that page is not available anymore.
If you want to resetup or relocate your device then follow the instructiions here [How do I reset the neuron software?](/most-common-issues/how-do-i-reset-the-neuron-software)
This will re-enable :1337
If you have NOT used the :1337 page before then run trough the checks listed here [Do this first: How do I know if the device is neuron enabled?](/most-common-issues/do-this-first-how-do-i-know-if-the-device-is-neuron-enabled)
# I am on the 1337 screen and it asks me for keys / doesn't accept the one I got
A common error is to insert the **neuron account key** and not the **neuron device key. These are different. Make sure you watch the video**
⚠️ If you ignore the video you will likely think that you have finished with the setup because you got a key. But you need to make sure you got a device key, thus don't ignore.
{% embed url="" %}
🚫 This is NOT they key you want!
If you got the key from that page then it's NOT the one
✅ Whatch the video, it'll show you the key you want (hint, it's under device details)
# When setting up 1337 it is stuck with a 3D GPS fix error message
When you're stuck here then it means that the device has not seen enough satellites to get a valid gps signal. Your antenna needs to see clear sky and it can take up to 15 minutes to observe the signal.
To troubleshoot, goto and look at then antenna statusI
If it's anything other than OK then
* Is the GPS antenna connected to the GPS jack?
* Have you screwed in the cable as tight as possible? Sometimes then nut gets stuck midway.
* Have you crossed antenna cables and they ended up in wrong jacks? That happens a lot with long cables and can be deceptive (planes might show up in the map but system is degraded).
# My device does not have a GPS fix
The solution is similar to this on [When setting up 1337 it is stuck with a 3D GPS fix error message](/most-common-issues/when-setting-up-1337-it-is-stuck-with-a-3d-gps-fix-error-message)
# I don't see my device on explorer.neuron.world
Make sure you have a [neuron enabled device](/most-common-issues/do-this-first-how-do-i-know-if-the-device-is-neuron-enabled) it is [connected to the internet](/most-common-issues/how-to-tell-if-the-device-is-connected-to-the-internet) , is [fully setup](/setup-instructions/connecting-to-neuron), and is funded with hbar using . You can check your device's balance in .
If you still cannot see the device then [grab a copy of the neuron logs ](/most-common-issues/how-do-i-see-my-devices-neuron-logs)and contact us.
{% content-ref url="/pages/t7hwY03KMmc6vC2yAUat" %}
[How do I see my device's neuron-logs?](/most-common-issues/how-do-i-see-my-devices-neuron-logs)
{% endcontent-ref %}
{% content-ref url="/pages/TRDE8phtPlssaF3So7dH" %}
[Troubleshooting & Support](/setup-instructions/troubleshooting-and-support)
{% endcontent-ref %}
# My device is red on explorer.neuron.wrold
Make sure the device is [connected to the internet](/most-common-issues/how-to-tell-if-the-device-is-connected-to-the-internet) , and is funded with hbar using . You can check your device's balance in .
Sometimes, devices do a hard-reset. To check if this has happened to you[ check if your device is still neuron enabled ](/most-common-issues/do-this-first-how-do-i-know-if-the-device-is-neuron-enabled)
If you still cannot resolve the red mark then [grab a copy of the neuron logs ](/most-common-issues/how-do-i-see-my-devices-neuron-logs) before contacting us.
# How do I see my device's neuron-logs?
Your device runs two neuron services, one updater and the main service. You'll find their logs by navigating to
Navigate to `http://my-jv-ip-address:1336/journalctl-sdk`
Navigate to `http://my-jv-ip-address:1336/journalctl-sdk-updater`
To copy the logs, click anywhere into the text and use keys control+a (command+a) to select all and then copy.
# How do I reset the neuron software?
Sometimes you want to reinstall the neuron software with a clean slate. The reasons you want to do this is either because you relocate or your keys are compromised (or corrupted) and want to start from scratch. To do so navigate to `http://my-jv-ip-address:1336/reinstall-package` Some earlier devices require `http://my-jv-ip-address:8080/reinstall-package` instead.
✅ DO let it spin for 20-30 seconds until you see a confirmation message
⛔ DO NOT refresh the page before you see the confirmation message
Now `http://my-jv-ip-address:1337` should be available again and you [can connect to neuron](/setup-instructions/connecting-to-neuron).
# How do I install the neuron updater?
Download the updater from github
rename the file `sdk-updater-package.ddeb` to `sdk-updater-package.deb`
Navigate to your device url [What is my JV device IP address and how do I know if it's a valid one](/most-common-issues/what-is-my-jv-device-ip-address-and-how-do-i-know-if-its-a-valid-one) and navigate to Settings > Software Maintainance > Manaul File Upload. Then upload the file you donwloaded to the RIGHT HAND BOX.
Wait until the word "back" appears at the end of the resulting messages stream.
# I get DNS resolution errors
Occasionally your router and the device fail to agree on DNS services and this can happen even if things were fine before. This is happening mostly on WLAN connections, thus you should try to see if a wired connection fixes the issue. If you must stay on WLAN then contact us as the fix will require some handholding either with us or Jetvision
# Admin fix: of I get DNS resolution errors
Occasionally your router and the device fail to agree on DNS services and this can happen even if things were fine before. This is happening mostly on WLAN connections, thus you should try to see if a wired connection fixes the issue. If you must stay on WLAN solution then contact us as the fix will require some handholding either with us of Jetvision
First port of call is to set the dns to google
```
sudo resolvectl dns wlan0 8.8.8.8 && sudo resolvectl domain wlan0 "~."
```
in one case we had to disable dnssec
```
sudo resolvectl dnssec wlan0 no
```
But it's a bad ides. Best one is to add to`sudo nano /etc/systemd/resolved.conf`
```
# This file is part of systemd.
#
# systemd is free software; you can redistribute it and/or modify it
# under the terms of the GNU Lesser General Public License as published by
# the Free Software Foundation; either version 2.1 of the License, or
# (at your option) any later version.
#
# Entries in this file show the compile time defaults.
# You can change settings by editing this file.
# Defaults can be restored by simply deleting this file.
#
# See resolved.conf(5) for details
[Resolve]
DNS=1.1.1.1
DNSOverTLS=opportunistic
DNSSEC=yes
#DNS=
#FallbackDNS=
#Domains=
#LLMNR=yes
#MulticastDNS=yes
#DNSSEC=allow-downgrade
#DNSOverTLS=no
#Cache=yes
#DNSStubListener=yes
#ReadEtcHosts=yes
```
and then `sudo systemctl restart systemd-resolved`
# Remote ssh into JV for admins
Login to the server
```
gcloud compute ssh --zone "europe-west12-b" "jv-rev-ssh" --project "savvy-parser-295910"
```
Kill everyone hogging port 1336 which are people that you have been serving
```
sudo fuser -k 1336/tcp
```
Change the password of the tunneluser
```
sudo passwd -u tunneluser # Unlock the account
sudo passwd tunneluser # Set a new password
```
Ask the user to login into his jervision using a terminal, command line etc.
```
ssh jetvision@youl-local-jv-address
```
Tell them to type
```
ssh -v -N -R '*:1336:localhost:22' -p 1337 tunneluser@34.17.45.17
```
and give them the password Ask them to sit tight now
Got to the server and type
```
ssh -p 1336 jetvision@localhost
```
After you are done close the tunnel user down
```
sudo passwd -l tunneluser
```
# The WIFI settings are missing
This happens sometimes when the wifi driver needs updating. To do so
You can download the driver from here
{% embed url="" %}
Then scroll to the middle of the page to find the download link
Navigate to your device url [What is my JV device IP address and how do I know if it's a valid one](/most-common-issues/what-is-my-jv-device-ip-address-and-how-do-i-know-if-its-a-valid-one) and navigate to Settings > Software Maintainance > Manaul File Upload. Then upload the file you donwloaded to the RIGHT HAND BOX.
Wait until the word "back" appears at the end of the resulting messages stream.
⛔ If it shows no text at all then rename the ending of the downloaded file from `.deb` to `.ddeb` and try again
# How do I enable remote support?
Come to discord and ask an admin to help you.
# What ports does the red box use?
Read the security guide
* TCP: 80, 443, 1337 for the UI and admin things, don't let outside users on them.
* UDP: 1352, 30066 - that's where streams are served from. You normaly do not need to open or forward these ports explicitly but should not block them.
* There is a case where a data buyer is on a restricted newtork (symmetric NAT) which you will not be able to serve if he's on a restricted network too.
{% content-ref url="/pages/Ac9vno3nIIXV7jS9sooJ" %}
[Advanced Security](/setup-instructions/advanced-security)
{% endcontent-ref %}
# How do I relocate the device?
You will have to reinstall the neuron software as outlined here. [How do I reset the neuron software?](/most-common-issues/how-do-i-reset-the-neuron-software)
# When logging into 4dsky I get a 404 / 401
This is a known bug that resolves by deleting the enire url in your browser address bar and simply navigating to `https://app.4dsky.com`
# Do my old explorer.neuron.world credentials work with 4dsky.com?
No. You need to create a new account for now.
# 4dsky.com does not recognise my credentials
If you try to use explorer.neuron.world credentials then these will not work. You will need to create a new account
# 4dsky.com is not showing planes from my sensor
First make sure that you [have internet](/most-common-issues/how-to-tell-if-the-device-is-connected-to-the-internet) and [have a commercial licence](/most-common-issues/how-to-tell-if-the-commercial-licence-is-enabled). It's easy to believe the device is on the internet when it's not. If there's no commercial licence then the device will not serve your outputs even if it appears on explorer.neuron.world.
Having sorted connectivity issues, the most common reason 4dsky is not showing your data is that the service is not buying from your sensor at the moment. This is either because it has run out of money, or because our dev team is trying different things, or because the service decided that it doesn't want to buy at this time.
Think of 4dsky as a customer with his own mind and own reasons for not choosing a sensor. This has nothing to do with favouring one sensor over another (for now) - it's how neuron is trying to test different scenarios and this has nothing to do with your contribution to the network.
Also, another common reason of not showing up is when the internet connection between the buyer and the seller becomes slow. The fault there is not necessary with you, the seller; in fact, it takes two to tango! In such cases, the packets arrive with a delay that's not useful to the buyer and the service simply discards packets. Overloaded networks cause delays. Streaming to too many buyers causes delays. Serving multiple sensor communities at once causes delays as well as overlaading the jetvision device with too many services.
# Overview
4DSKY has developed a framework based on the Neuron SDK, that is utilised in all of its products. This section will describe the framework, its principals and core components.
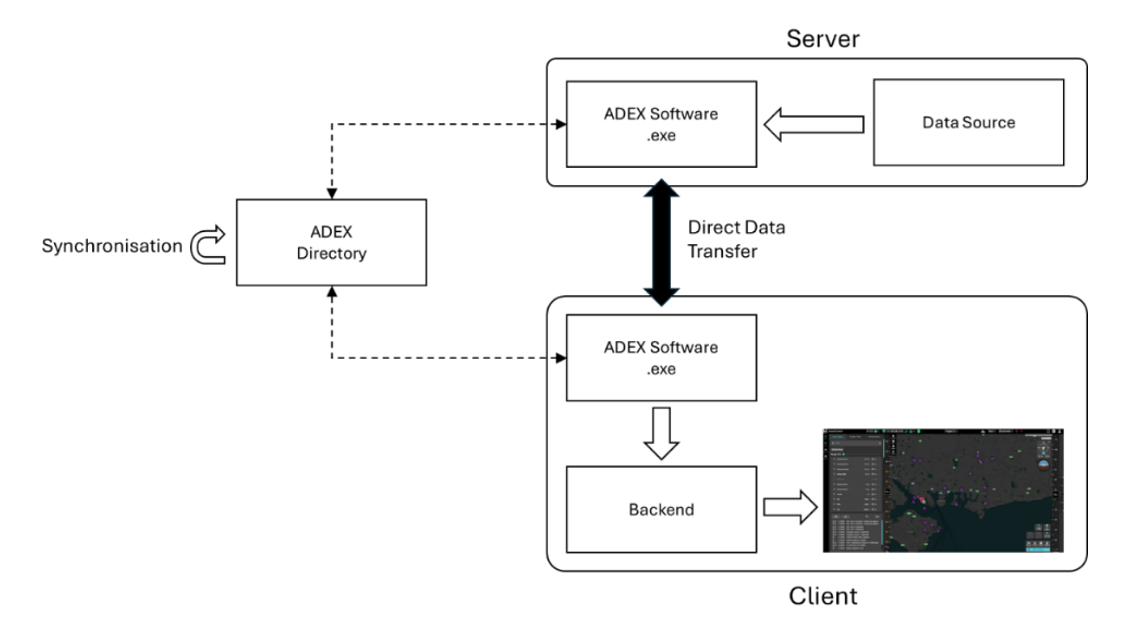
4DSKY is the founding architect of the Aviation Data Exchange (ADEX), which is an open-source, edge-native aviation surveillance data distribution model designed to support real-time airspace situational awareness, driven by the requirements of high performance, secure, fault tolerant, and digitally native drone operations. The system architecture is built on the foundational premise that both servers and clients function as independent actors, coordinated through a series of functional systems as defined below:
Servers advertise their capabilities, operational metrics, and service-level parameters to the ADEX directory service, enabling clients to select them according to mission-critical constraints. Clients can authenticate, subscribe, and validate data feeds over secure point-to-point links, benefiting from edge-level fault tolerance and local control of data.
# Directory Service
The ADEX Directory Service is a foundational component of the ADEX framework, enabling the secure discovery, registration, and coordination of surveillance data services across a distributed environment. Drawing conceptual inspiration from the Discovery and Synchronization Service (DSS) in InterUSS, the ADEX Directory facilitates a modular, federated ecosystem by acting as a trusted registry of available data feeds.
The directory service comprises a database and a set of APIs that are synchronised via the [Hedera public ledger](http://www.hedera.com). Hedera acts as a distributed consensus layer across all directory instances, ensuring that service records are consistent, tamper-evident, and resilient to failure or manipulation via an aBFT consensus protocol.
The ledger provides cryptographic timestamping and auditability for every directory entry, making it possible to trace service availability, integrity changes, and operational history with full transparency. This enables directory providers to operate independently while remaining part of a coherent, synchronised ecosystem—eliminating the need for any single trusted intermediary and reinforcing the decentralised philosophy underpinning ADEX.
**Function and Operation**
At its core, the directory enables data providers (e.g. sensors, platforms and data servers) to publish metadata about the surveillance data they have available, while allowing clients (e.g. DAA systems, FIDs, UTM platforms) to query for and establish connections to those data services in real time.
* Registration: Each client or server can register metadata such as geographic coverage, update rate, latency, data format, and integrity confidence to one or more directory instances.
* Discovery: Clients query the directory using configurable filters (e.g. location, data quality, redundancy level) to identify relevant servers that meet operational or regulatory criteria.
* Connection: Once a suitable service is found, the client establishes a direct, authenticated point-to-point connection with the server, bypassing the directory entirely for runtime data flow.
**Key Attributes**
* Federated and Open: The directory is not a centralised platform. It is an open-source, interoperable specification that can be implemented and hosted by any compliant organisation, supporting jurisdictional flexibility and competitive innovation.
* Synchronised State: To ensure consistency across multiple directory instances, state synchronisation is achieved using the Hedera public ledger. This provides an immutable record of published services and enables secure coordination between independent operators.
* Resilience and Redundancy: Consumers can query multiple directory services in parallel, ensuring high availability and operational continuity. If one provider becomes unavailable or untrusted, alternate directories can be substituted without reconfiguration.
* Fine-Grained Filtering: The directory supports extensible metadata tagging, allowing consumers to identify feeds with specific capabilities (e.g. data type, location, quality, availability).
* Market Enabler: By decoupling discovery from delivery, the ADEX Directory creates a level playing field for both commercial and public sector participants. Specialised directories can offer differentiated services, from curated datasets to SLA-certified access, fostering innovation and service quality.
**Strategic Value**
The ADEX Directory Service is more than a technical registry, it is a governance and trust layer that enables scalable coordination without imposing centralised control. It ensures that operators, regulators, and service providers can interact within a common framework while maintaining autonomy, resilience, and auditability across the ecosystem.
# Implementation
4DSKY utilises a generic directory service offered by [Neuron](https://www.neuron.world) (the Neuron explorer) that was produced to enable any server and client to connect with one another. However, 4DSKY is currently working on creating its own directory that is native to the ADEX framework to eliminate traffic congestion, and provide redundancy.\
\
Neuron's explorer includes:
1\. The core directory service – with APIs for server/ client interactions
2\. A synchronisation service – to synchronise the directory with other directories
3\. A registration system – for adding servers/ clients to the directory
4. A device manager – for managing server/ client credentials
5. A visual map explorer – providing a view of all live servers/ clients
# Benefits
The ADEX framework has been explicitly designed to meet the core requirements for drone detect & avoid (DAA) systems, and airport flight information displays (FIDs). Unlike traditional centralised architectures, which concentrate data handling and routing within a small number of cloud or enterprise systems, ADEX distributes decision-making and data ownership across a framework of independently operated clients and servers. This structural difference allows it to better satisfy key operational objectives:
|
Delays from network hops and cloud buffering, particularly in peak periods, can compromise latency.
|
Point-to-point architecture easily achieves sub-2 second latency, even during peak periods
|
|
Availability
|
Failure at the central hub causes loss of surveillance data across all dependent systems.
|
Independent server/client operation with local processing localises faults and maintains service continuity.
|
|
Scalability
|
Requires vertically integrated expansion, which can bottleneck growth.
|
Horizontally scalable through independent deployment of sensors, data servers, and display providers.
|
|
Openness
|
Closed interfaces limit integration and competitive innovation.
|
Standards-based interfaces enable plug-and-play interoperability across the surveillance ecosystem.
|
|
Agency
|
External domain data handling reduces control for local stakeholders.
|
Servers and clients can be locally hosted, giving full control over data governance and security.
|
|
Federation
|
Limited compatibility with federated or independent systems.
|
Supports discovery and coordination among independently managed systems.
|
|
Resilience
|
Central points of failure are vulnerable to cyber threats and outages.
|
Distributed architecture eliminates single points of failure and enables graceful degradation.
|
# Integration
An open-source implementation of the ADEX software has been developed to support both clients (e.g. DAA systems, FIDs, UTMs) and servers (e.g. ADS-B, FLARM, UAT sensors and data servers). The software is packaged as a standalone executable that can be installed directly onto the host system with minimal setup, and is designed to operate in diverse operational environments including embedded, tower-based, and remote field deployments, as well as the cloud.
ADEX software exposes a set of common integration interfaces (via standard input/output/error, local APIs, and message brokers) to allow seamless interaction with the host application. On the server side, this includes ingesting data from local sensors and broadcasting telemetry; on the client side, it supports subscribing to and validating incoming feeds in real time.
Each ADEX participant (client or server), is assigned a unique public identity during registration, managed via the ADEX Directory Service. Clients query the directory to discover suitable servers based on parameters such as geographic coverage, latency, integrity, and availability. Once a match is found, the client initiates a direct, authenticated connection with the server.
All communications are established over encrypted point-to-point links, using cryptographic key exchange and mutual authentication to ensure integrity and confidentiality. Server IP addresses and endpoint metadata are shared through the directory service as part of the discovery process, enabling clients to initiate secure and policy-compliant connections automatically.
This decentralised integration model eliminates the need for central brokers, reduces latency, and provides system operators with full control over which entities they connect to and how. The ADEX software thus serves as a lightweight but powerful enabler of real-time surveillance data exchange across distributed aviation environments.
# Example
To illustrate the operational capabilities of the ADEX framework, a reference implementation is provided based on a typical BVLOS drone operation alongside an airport and UTM environment. In this scenario, multiple systems—including Flight Information Displays (FIDs), Detect and Avoid (DAA) systems, and Unmanned Traffic Management (UTM) platforms, are integrated with ADEX directly and connect to sources independently to ingest real-time ADS-B surveillance data.
In this example, display providers are able to select which data-sources they want to ingest based on criteria published to the directory. For example, they may have an availability threshold, or require connection to sensors that are inspected by the regulator (such as those at airports). This architecture allows software designers to build custom rules to suit their specific application, rather than relying on cloud services that are unwilling or unable to release this information.
4DSKY has integrated ADEX with 2 types of server (aviation sensors):
1\. **uAvionix Pingstation 3** – offering ADS-B (1090mhz), UAT (978mhz) and timestamping suitable for MLAT. This is an integrated unit with sensor and antenna fully integrated and contained in a weather proofed IP67 case.
2\. **Jetvision Airsquitter** – offering ADS-B (1090mhz), UAT (978mhz) or Flarm (868mhz), and timestamping suitable for MLAT. This sensor must be placed indoors, with antennas installed outdoors.
In addition, 4DSKY has integrated this into several clients, including Drone ground control station software (Distributed Avionics/ Windracers, and Skydrones), UTMs (Drone Cloud and Anra), and an open-source FID (OpenFID). Two examples are provided below:
OpenFID (left) and Distributed Avionics (right)
Below is an workflow diagram from end-to-end that describes how the process works: